FAQs
Contents
FAQs#
Note
This page is still being written. More FAQs coming soon!
Debugging local builds#
A lot of things can generally go wrong when building an article with showyourwork!. The workflow will try its best to give you an informative error message, but if you can’t figure out what the problem is (or you don’t know how to fix it), consider the following tips:
Inspect the build logs. These live in
.showyourwork/logsand contain a lot of the verbose output that’s suppressed from the terminal by default (see Logging).Run
showyourwork cleanor, if that doesn’t help,showyourwork clean --force. These commands remove all build output, which could help resolve issues caused by builds that are interrupted by an error or when the user cancels them halfway. If you don’t want to lose your output, you could also try just deleting the temporary.showyourworkdirectory (instead of running thecleancommand), which removes the cache and forces re-evaluation of the build graph.Identify which part of the workflow is causing the problem. Is it during the run of a particular figure script? Consider adding a
breakpointin your code to enable interactive debugging. Or is the problem specific to the LaTeX build step? LaTeX errors, in particular, can be extremely cryptic. Inspect the.showyourwork/logs/tectonic.logfile for details. Consider commenting out portions of your manuscript to identify which part is causing the problem.If one of your figures is causing a new error, it can be helpful to temporarily bypass it by placing the old figure output (e.g., the
.pdffile) in thesrc/staticdirectory and commenting out the\scriptcommand in the TeX file. This causes showyourwork! to treat the figure as static, preventing it from trying to re-generate it the next time you runshowyourwork.Sometimes, cryptic errors can occur if you’ve made a mistake in the config file. Certain settings require a very specific YAML syntax, so please check The showyourwork.yml config file to ensure you’ve provided, e.g., the
datasetsinformation correctly.Make sure you are using the latest version of showyourwork!, as your error could be due to a bug we have since fixed! You can always upgrade to the latest version by running
pip install -U showyourwork.Check the GitHub Issues to see if others have run into the same issue. It’s also worth checking out the closed issues for ones that have already been resolved!
If all else fails, feel free to raise a new issue, and we will do our best to get back to you with suggestions promptly.
Debugging remote builds#
If your article build works locally but fails on GitHub Actions, a few different things could be going on.
A common cause is you forgot to push a particular script to the remote, so make sure you don’t have any unstaged changes, and that your
.gitignorefiles aren’t preventing you from committing necessary files.It’s also useful to make sure you’ve provided all the necessary repository secrets, such as
SANDBOX_TOKEN, which is used to access the Zenodo Sandbox API to download files from the remote cache. See Zenodo integration for details. If you’re reproducing someone else’s article and don’t have access to their API token, you can either setrun_cache_rules_on_citotruein the config file to allow running cached rules on GitHub Actions (see The showyourwork.yml config file), or you can switch to a cache deposit you have read/write access to. To do this, delete thezenodo.ymlfile at the root of the repository and runshowyourwork cache create(after making sure you’ve defined the$SANDBOX_TOKENenvironment variable; see Zenodo integration). Run the workflow locally to populate the cache, then commit and push your results. If you’ve provided theSANDBOX_TOKENrepository secret on GitHub (see Zenodo integration), the workflow should now be able to access the Sandbox cache.A different issue potentially affecting remote builds is hysteresis in your local workflow: for example, you may have built your article successfully, then deleted one of the scripts needed to generate a figure. The next time you build your article, the build could succeed since the figure output is present and there are no new instructions specifying how to build it (because the input file was deleted). On the remote, however, where the output file does not exist, you will get a build failure. You can avoid these sorts of issues by setting
require_inputstotruein the config file (see The showyourwork.yml config file), although in recent versions of showyourwork! that should already be the default.Another issue has to do with the fact that showyourwork! uses conda environments instead of actual containers or virtual machines. Conda environments are not always free of contamination from packages installed in the global scope. For instance, one can import a package from outside the workflow’s isolated conda environment by tinkering with the
$PATHenvironment variable within a Python script. Such a workflow could succeed locally but fail on the remote, where that package may not be present in the global environment. This can especially be a problem if you are using tools, packages, or software that are not managed by conda. In that case, make sure you are also installing them and making them available to the GitHub Actions runner. An example of this is covered below in Rendering LaTeX in matplotlib, wherematplotlibmay require access to a full LaTeX installation to render LaTeX strings. Such builds will fail on the remote unless LaTeX is manually installed in the workflow YAML file.Finally, one can mimic the behavior of the remote build by setting the
CI=trueenvironment variable prior to runningshowyourwork. Depending on the nature of the error, it could also make sense to look into tools that allow direct interaction with the runner on GitHub Actions, such as action-tmate.
Issues due to git#
The showyourwork! workflow relies heavily on command line calls to git.
The pipeline is tested for git>=2.24.0, so certain issues may arise with
older versions. For instance, prior to version 0.3.0.dev9 of showyourwork,
the current git branch was determined by running git branch --show-current,
an option that was only introduced in git==2.22.0 and led to strange
behavior on platforms running older versions of git. This issue has since
been addressed, but there may be others that you might encounter if your
git is significantly out of date.
You can always check which version of git you are using by
running git --version, and upgrade it if needed using homebrew (MacOS)
or apt-get (Linux).
Permissions errors in GitHub Actions#
If you try to build a showyourwork! article from a repository fork
on GitHub Actions, you may run into the following error when the action
attempts to push the results to the -pdf branch:
Uploading output
/tmp/tmp.KORuhtnUA7
Switched to a new branch 'main-pdf'
[main-pdf (root-commit) 224ecfd] force-push article output
2 files changed, 0 insertions(+), 0 deletions(-)
create mode 100644 arxiv.tar.gz
create mode 100644
remote: Permission to $USER/$REPO.git denied to github-actions[bot].
fatal: unable to access 'https://github.com/$USER/$REPO/': The requested URL returned error: 403
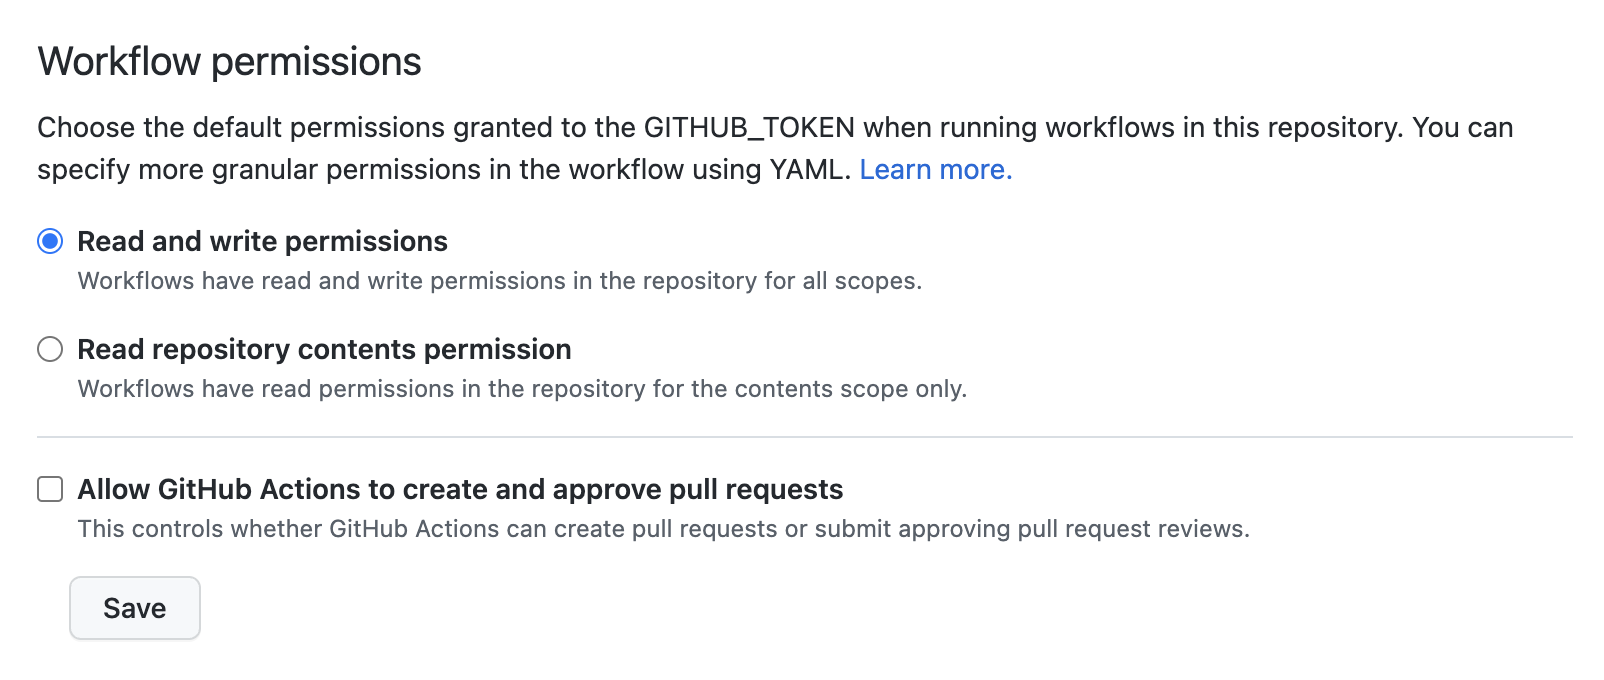
This happens because the default GitHub Actions permissions for the GITHUB_TOKEN
secret are set to restricted for repository forks. To get the build to work,
go to
https://github.com/$USER/$REPO/settings/actions
and change the permissions to permissive:
Rendering LaTeX in matplotlib#
When plotting with matplotlib, if you run into errors that look like
FileNotFoundError: [Errno 2] No such file or directory: 'latex'
or
RuntimeError: Failed to process string with tex because latex could not be found
you are probably missing a proper latex installation. Recall that showyourwork!
uses tectonic to build your article, which is not compatible with matplotlib.
Instead, you’ll have to install a separate TeX distribution, such as TeXLive or MiKTeX.
The same applies to runs on GitHub actions.
The simplest workaround is to disable LaTeX rendering in matplotlib:
import matplotlib.pyplot as plt
plt.rcParams.update({"text.usetex": False})
Math-mode strings can still be parsed using the built-in matplotlib renderer,
and in most cases this will do what you need. In some cases, however, the built-in
renderer may not cut it. If you really need a proper LaTeX installation, you’ll
have to do a bit of extra work to get your build to pass on GitHub Actions.
First, add the following step to the build.yml and build-pull-request.yml
workflows in your .github/workflows folder, just before the showyourwork!
build step:
- name: Install TinyTex for matplotlib LaTeX rendering
  id: tinytex
  shell: bash -l {0}
  run: |
    wget -qO- "https://yihui.org/tinytex/install-bin-unix.sh" | sh
    sudo ~/bin/tlmgr install type1cm cm-super
This will install TinyTex, a
very lightweight TeX distribution that should provide everything you need. Note
that this step also installs the type1cm and cm-super LaTeX packages,
which may be required by matplotlib. You can specify additional packages
in the same line if needed.
Then, in order for matplotlib to execute latex, the ~/bin path needs to
be in the system $PATH. This variable gets overwritten when running scripts inside isolated
conda environments (as showyourwork! does), so you’ll need to add ~\bin
to the $PATH within your Python script. Therefore, add the
following bit of boilerplate to the top of any scripts that require LaTeX parsing:
import os
from pathlib import Path
os.environ["PATH"] += os.pathsep + str(Path.home() / "bin")
To save some typing, you could instead add this boilerplate to the
src/scripts/paths.py file so that
these commands get executed whenever that file is imported into your scripts.
Using paths.py within scripts subdirectories#
For complicated workflows, you may wish to organize your scripts directory into subdirectories.
However, this creates a problem with using the paths module, since import paths relies on paths.py being in the same directory as your scripts.
There is a simple workaround for this issue.
Simply add showyourwork as a dependency in environment.yml, and add the following to the top of your scripts:
from showyourwork.paths import user as Paths

# instantiate the paths
paths = Paths()
You can now use paths.data, paths.figures, etc. as usual.
Note that if you decide to take this approach, we recommend that you pin the version of showyourwork in environment.yml to the same version specified in the showyourwork.yml config file. See this comment for a brief discussion.
Using LaTeX fonts in matplotlib without installing LaTeX#
If you just want matplotlib to use Computer Modern fonts so that the font in your plots matches the font in your manuscript, you can accomplish this without the full LaTeX installation described above.
Just add the following lines to src/scripts/matplotlibrc:
# set font to match LaTeX's Computer Modern
font.family: serif
font.serif: cmr10
mathtext.fontset: cm
axes.formatter.use_mathtext: True # needed when using cm=cmr10 for normal text
Using LaTeX Workshop in VSCode#
If you edit and build your articles in VSCode, you need to specify some settings so that VSCode knows to use showyourwork! to build your document.
You can do this by creating (or editing) a workspace-specific settings file, .vscode/settings.json, in the root directory of your repo.
At minimum, you should add the following lines:
{

    # other settings here

    "latex-workshop.latex.external.build.command": "showyourwork",
    "latex-workshop.latex.external.build.args": [],
    "latex-workshop.latex.outDir": "%WORKSPACE_FOLDER%",
    "latex-workshop.view.pdf.viewer": "tab"

}
This enables you to build the document using LaTeX Workshop: Build LaTeX project in the command palette.
Note that the final line tells LaTeX Workshop to open your article pdf in a VSCode tab.
Feel free to change tab to browser if you would rather LaTeX Workshop open your article in a browser tab.
If you also want to use LaTeX Workshop’s AutoBuild on save (or on file change), you can add the following lines to the settings file:
{

    # other settings here

    "latex-workshop.latex.recipe.default": "showyourwork",
    "latex-workshop.latex.recipes": [
        {
            "name": "showyourwork",
            "tools": [
                "showyourwork"
            ]
        }
    ],
    "latex-workshop.latex.tools": [
        {
            "name": "showyourwork",
            "command": "showyourwork",
            "args": [],
            "env": {}
        },
    ]

}